
Updated for new FreePBX version
I wrote a new article for the FreePBX dashboard by a Linux agent, and you can check it out first.
/how-to-create-a-dashboard-for-freepbx-in-2-minutes
Many businesses have used asterisk PBX today, and it is an excellent choice for many types of businesses and needs. Some very rich features power asterisk; you should pay more than 10K US dollars for other platforms and PBX systems. But one of the big problems in Asterisk platforms is that they are very complicated to work with and need the user to have in-depth knowledge about settings.
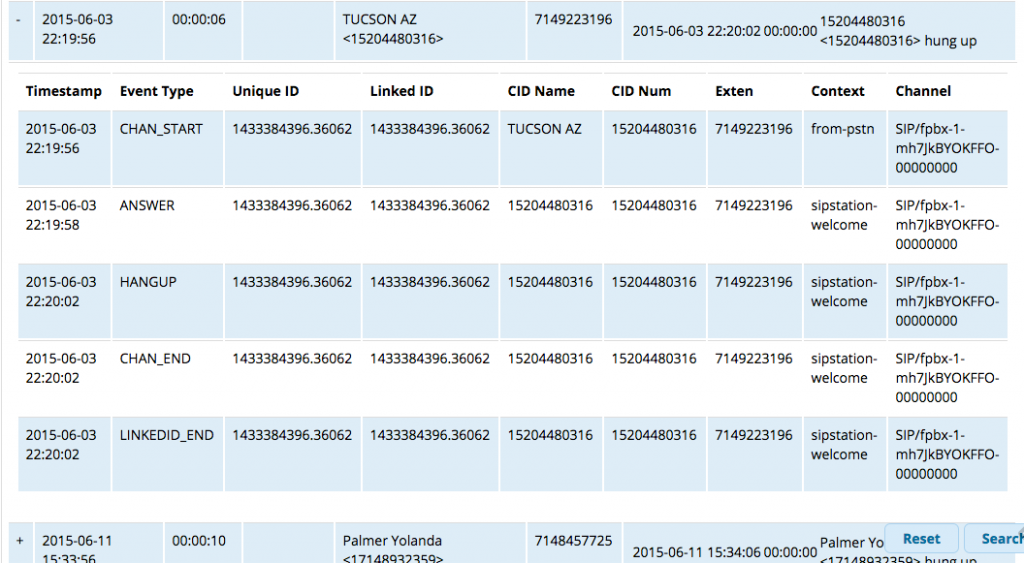
One of the essential capabilities of any telephone system is reporting and monitoring. You can find a simple report and dashboard bundled with some copies of Asterisk. For example, you can only have a few dashboards and reports in the Elastix, or some other ones in the Asterisk now, or FreePBX.
All of them do not give you a comprehensive idea of what has happened in your company and never cover all calls.
For example, in FreePBX, you can use the report section for incoming and outgoing calls in a simple table, as depicted below.
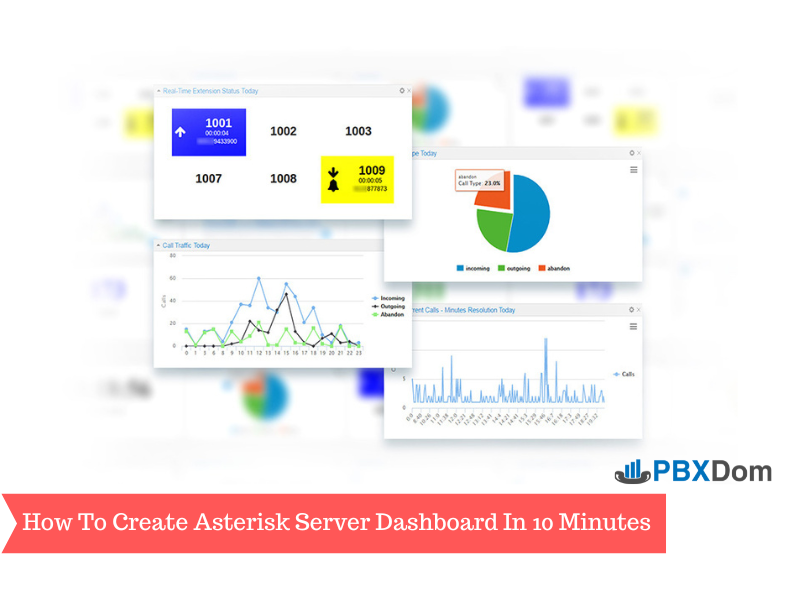
This article wants to show you how you can Create an Asterisk Server Dashboard in 10 Minutes. If you are here for the same reason, then follow along with my instructions step by step.
Step 1:
Signup in PBXDom from the following link:
www.pbxdom.com/pricing/
Step 2:
When you confirm your account by the link sent to your email, you are redirected to the setup page on the PBXDom website.
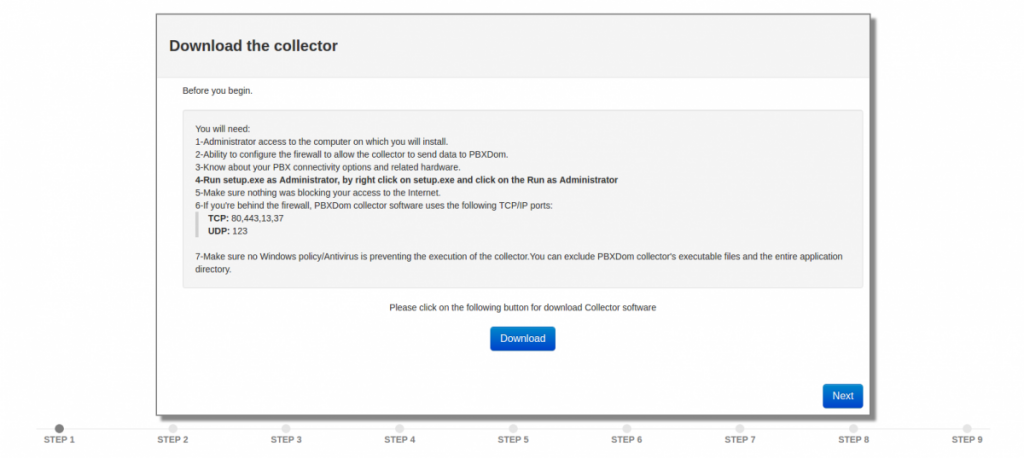
Step 3:
Before beginning, you will need:
1-Administrator access to the computer on which you will install.
2-Ability to configure the firewall to allow the collector to send data to PBXDom.
3-Know about your PBX available connectivity options and needed hardware.
4-Run setup.exe as Administrator by right-clicking on setup.exe and selecting the Run as Administrator.
5-Make sure nothing is blocking your access to the Internet.
6-If you’re behind the firewall, PBXDom collector software uses the following TCP/IP ports:
TCP: 80,443,13,37
UDP: 123
7-Make sure no Windows Policy/Antivirus is preventing the execution of the collector. You can exclude PBXDom collector’s executable files and the entire application directory.
Step 4:
Download the Collector software by click on the Download button and go to the next step.
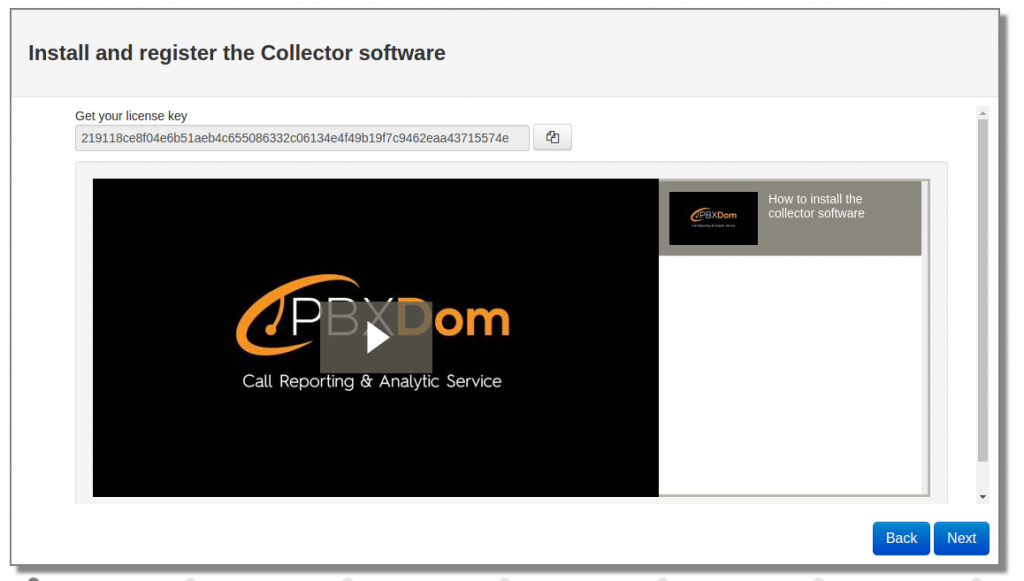
Step 5:
Install collector software, copy your license key, paste it into your collector, and press the register button. After your collector registered successfully, press the start button on your collector.
Please watch the following video to know how to install the collector data.
In the next step, you will see the following window.
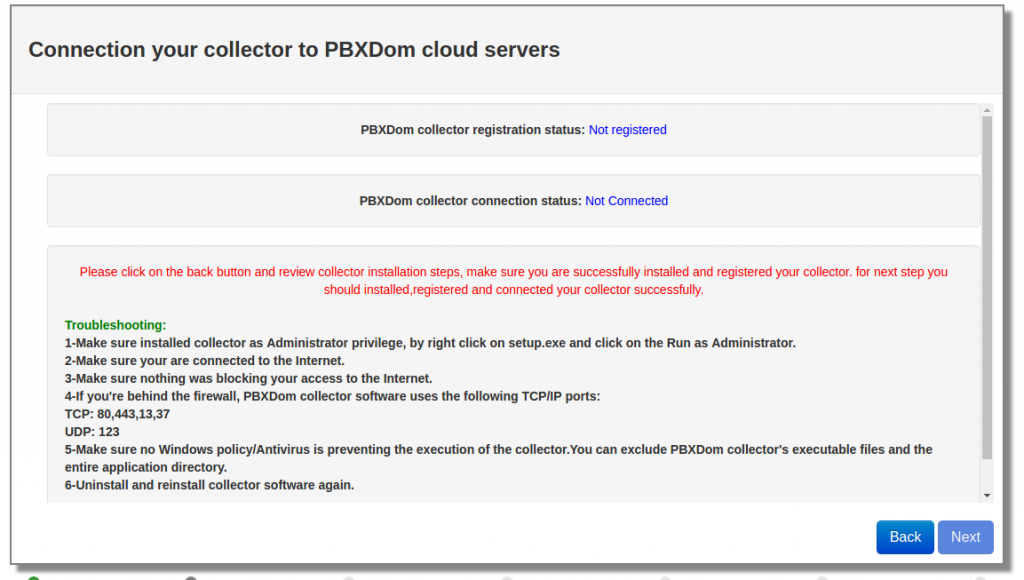
If you successfully registered your collector and started it, the PBX collector registration status changes from Not registered to Registered and collector connection status from Not connected to Connected like the following window after a few seconds.
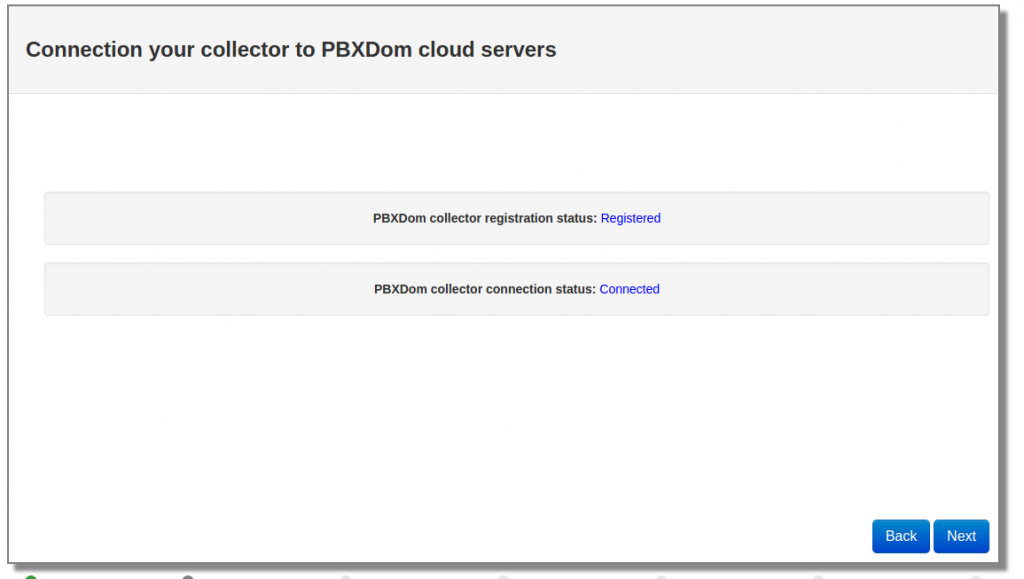
Now you can click on the Next button.
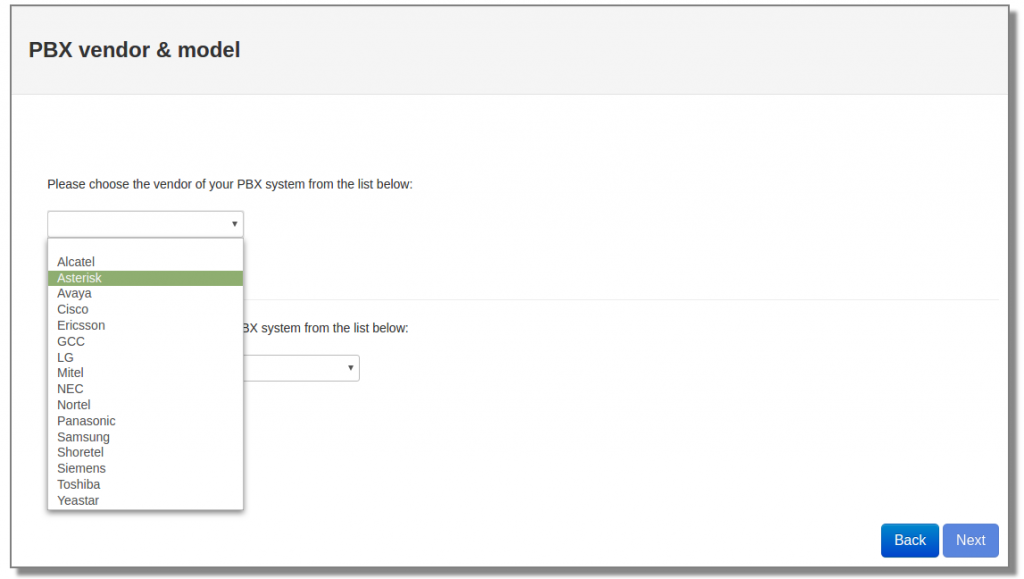
Step 7:
Select Asterisk from the vendor list.
Select Asterisk from the model list and click on the Next button.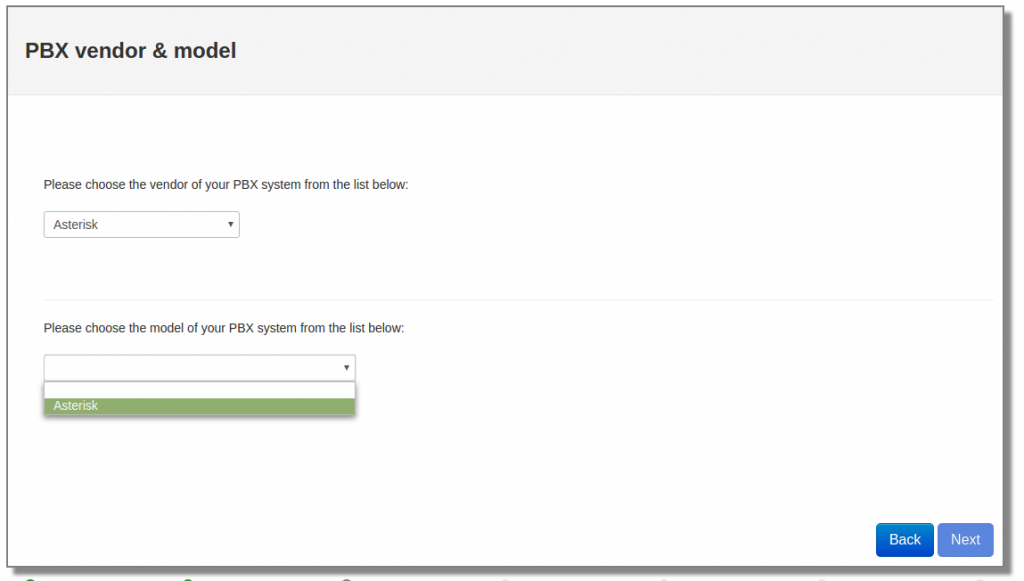
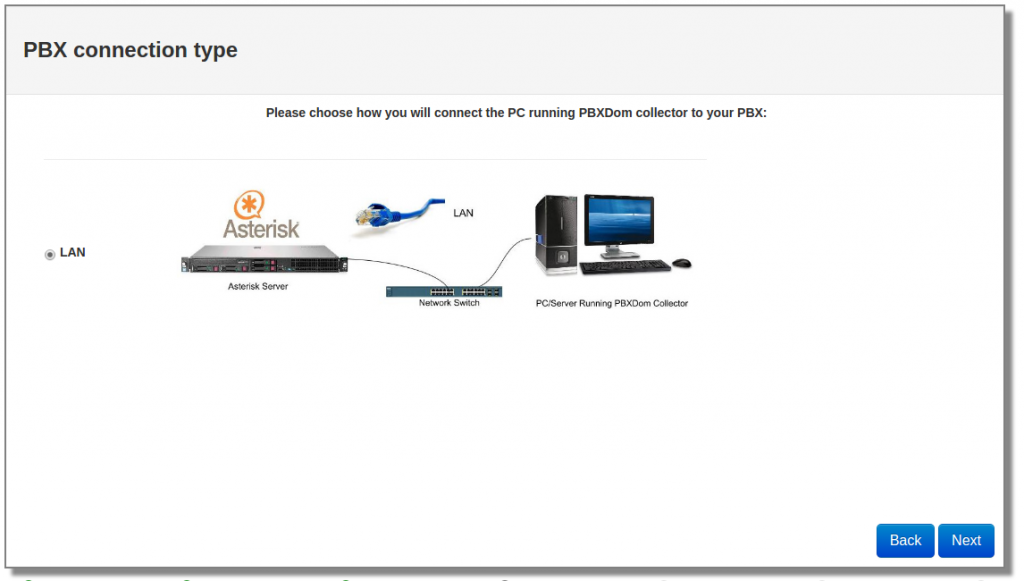
Step 8:
Click on LAN connection and click on the Next button.
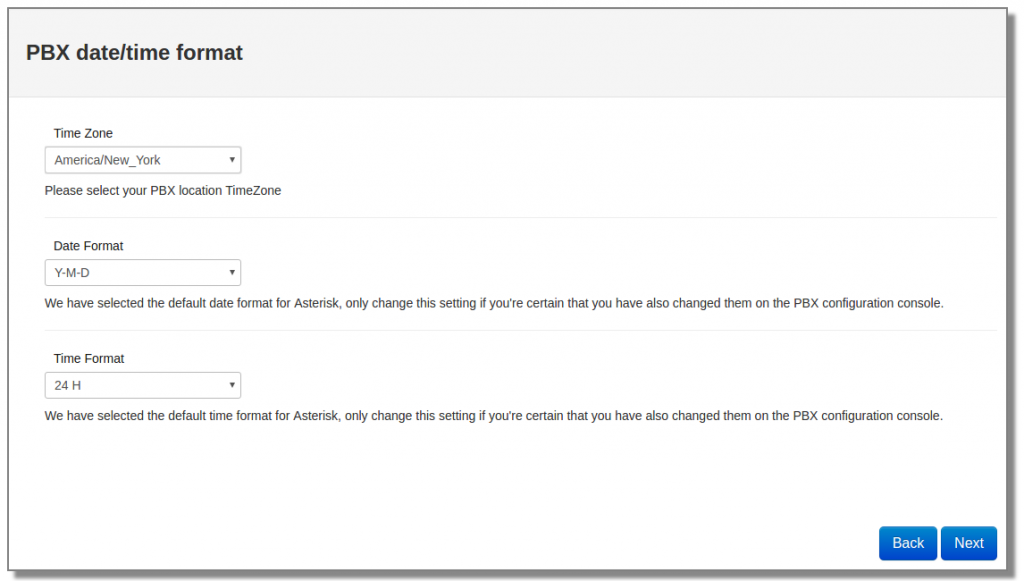
Step 9:
Select only your time zone and leave other settings as set by default.
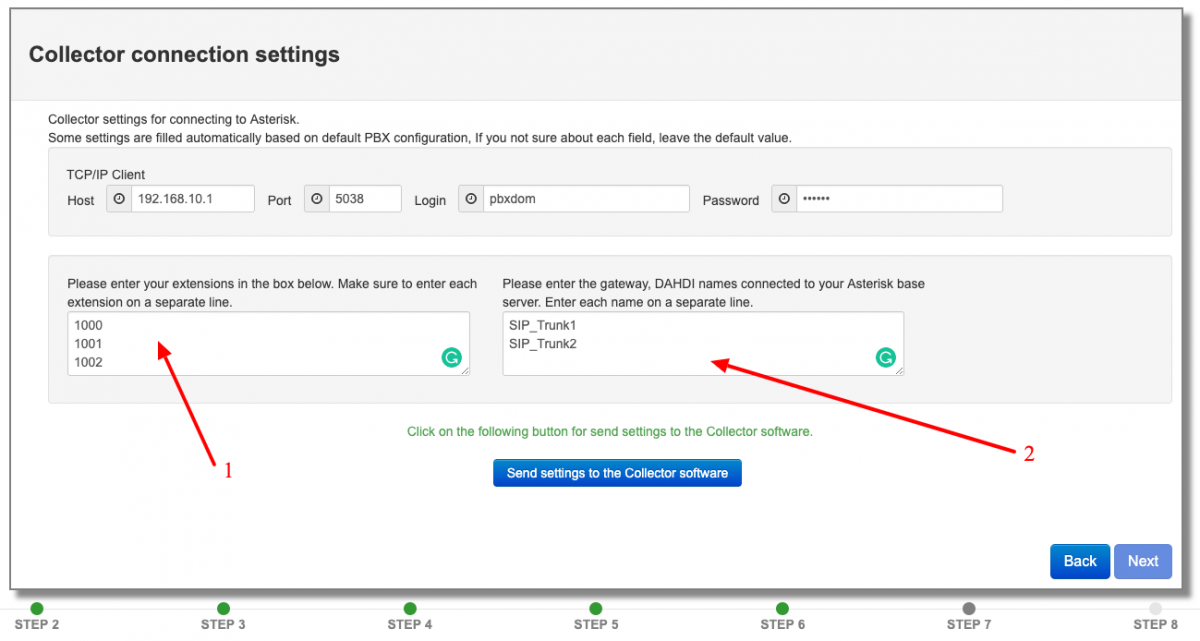
Step 10:
Enter your Asterisk server IP address in the Host field and leave other settings as set by default.
You have to enter your extensions and trunks here, if you did not enter them, the PBXDom can’t identify them correctly, and you can’t see anything on your dashboard. For finding your extensions and trunks list, you can use the GUI web console, or you can use the following command in your Asterisk server:
1-Login into your Asterisk server by SSH
2-Enter the following command:
[cc]asterisk -rx “sip show peers”[/cc]
Finally, to send settings to your collector, click on the “send settings to the collector software button.”
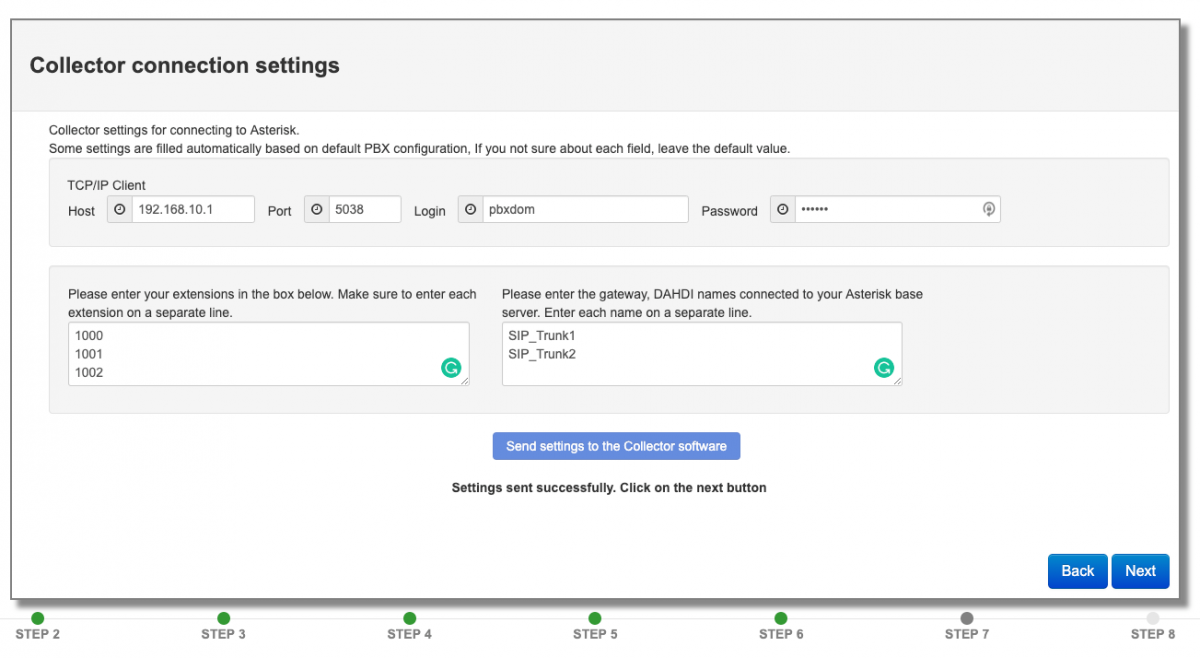
After the settings are successfully sent to your collector, you should see the following message, and you can click on the Next button.
Step 11:
On Windows, you can find information about configuring your Asterisk server accepting a connection from the collector server.
For configuring your Asterisk server, connect to your Asterisk by putty or any SSH client.

Enter your Asterisk server IP address and click on the Open button.
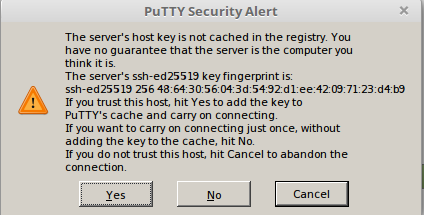
If it’s the first time you are trying to connect your Asterisk server from your machine, you see a warning message, as illustrated below. You should click on Yes to continue.
When connected, enter your username and password for your Asterisk server.
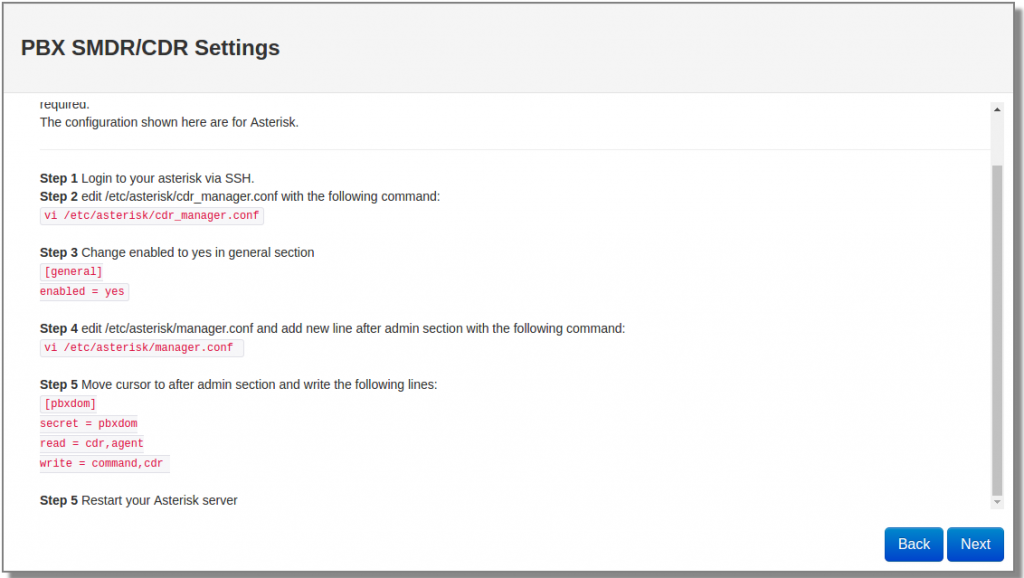
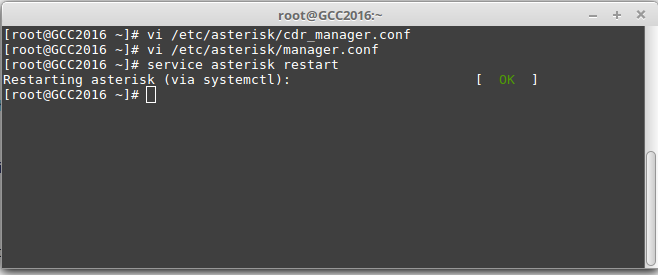
After connection to server edit /etc/asterisk/cdr_manager.conf with the following command:vi /etc/asterisk/cdr_manager.conf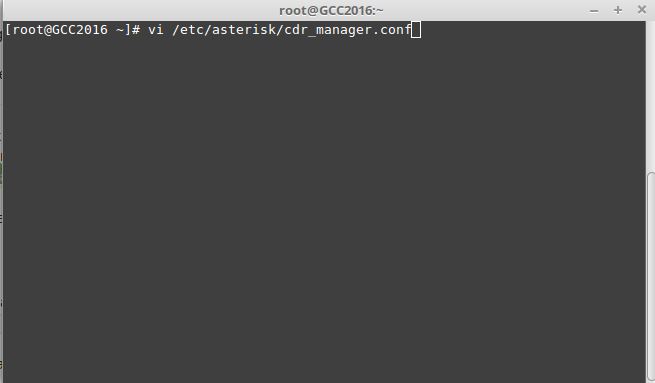
And press Enter key.
In the editor, change enabled to “yes” in the general section.
Change from
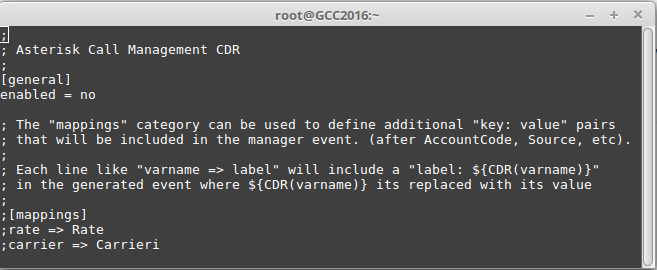
To

To enable editing mode, press, I key on your keyboard, and to finish it, press ESC.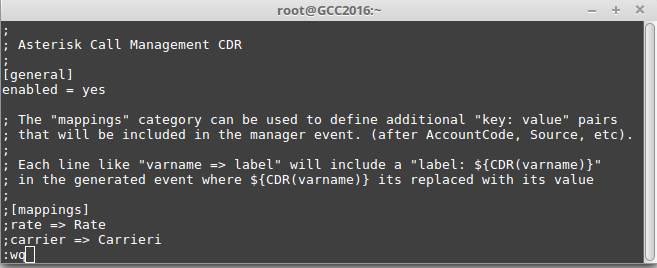
For saving type: and “wq” and enter
edit /etc/asterisk/manager.conf And add a new line after the admin section with the following command:vi /etc/asterisk/manager.conf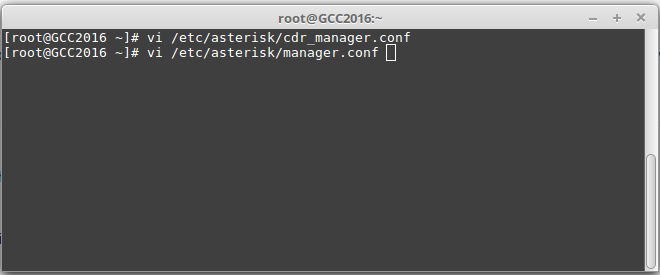
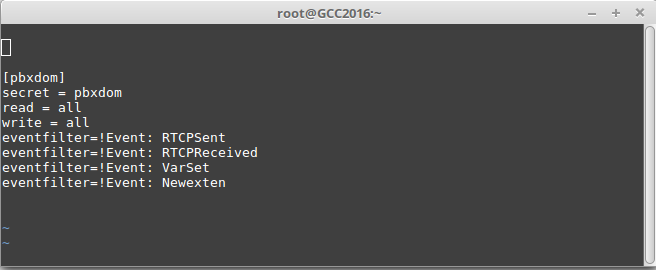
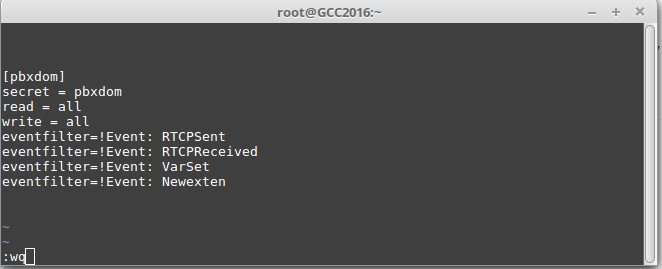
Move the cursor to the end of the file and write the following lines:[pbxdom] secret = pbxdom read = all write = all eventfilter=!Event: RTCPSent eventfilter=!Event: RTCPReceived eventfilter=!Event: VarSet eventfilter=!Event: Newexten
For save type: and “wq” and enter
Restart your Asterisk server by the following command:Service asterisk restart
After configuring your Asterisk server click on the Next button on PBXDom wizard.
Step 12
In the next window, you should wait till all the call data get loaded to your account.
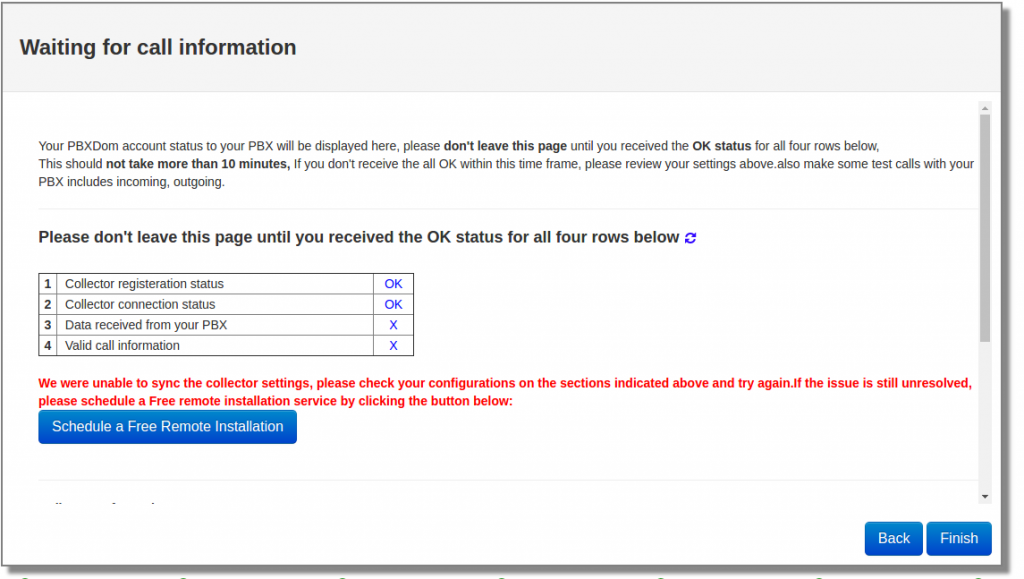
Please don’t leave this page until you receive the OK status for all four rows below,
This should not take more than 10 minutes. If you don’t notice all the OK within this time, please review your settings.
Also, make some test calls with your PBX to include a few incoming, outgoing.
If the issue is still unresolved, please schedule a Free remote installation service by clicking the button below:
After a few minutes, you should receive 4 OK and windows change to the following message on your screen:
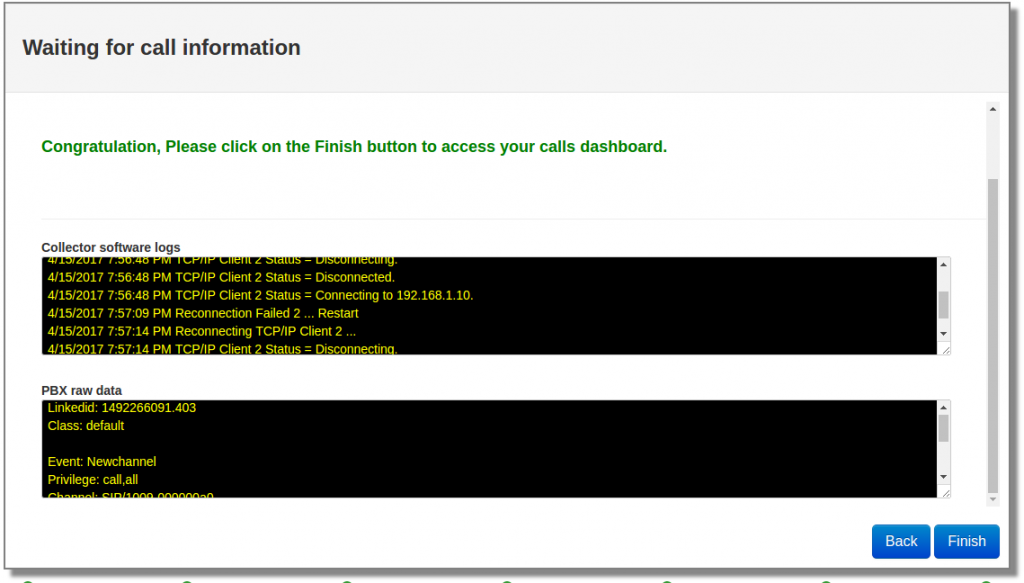
Congratulation, Please click on the Finish button to access your calls dashboard.
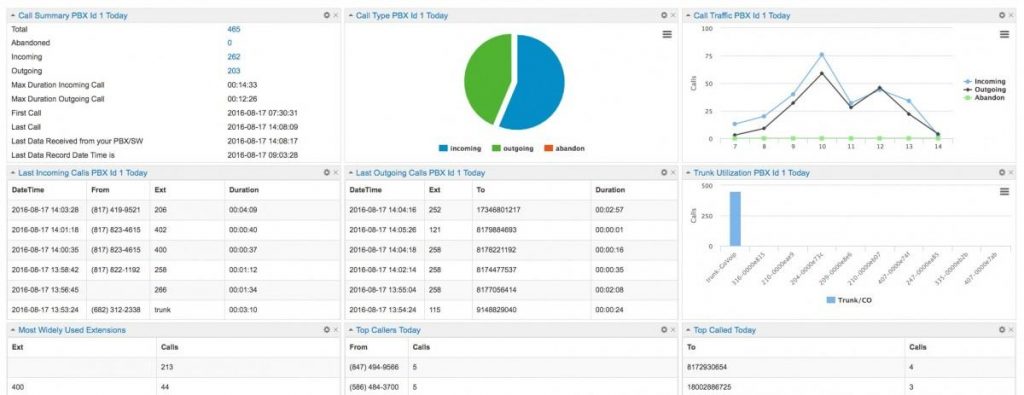
You can make as many as 50 dashboards as you want in the PBXDom. You can add up to 12 widgets in each dashboard from more than 60 available widgets.
Also, you can share a read-only dashboard all across your entire organization.
Finally, you can find a complete set of reports, charts in the reports and chart section.
I hope this article helps you find a straightforward solution for making a Real-time dashboard for Asterisk-based systems.