

I wrote several articles about creating a dashboard for Asterisk-based phone systems like Asterisk, FreePBX, and Issabel; you can find them on the following pages:
How to Create FreePBX Dashboard In 10 Minutes | PBXDom
www.pbxdom.com/blog/engineering/how-to-create-freepbx-dashboard-in-10-minutes/
How to Create Issabel Dashboard In 10 Minutes
www.pbxdom.com/blog/engineering/how-to-create-issabel-dashboard-in-10-minutes/
How to Create Asterisk Server Dashboard in 10 Minutes
www.pbxdom.com/blog/engineering/how-create-asterisk-server-dashboard-10-minutes/
If you read any of them, you’ll find that they all follow the same instructions step by step except for each phone system, GUI, and menu.
Generally, for all of them, you have to install the PBXDom collector on the Windows machine and then connect it to your Asterisk, FreePBX system.
Some of our users reported facing the following issues and problems:
1- All Asterisk-based phone systems (Now FreePBX) installed on Linux, having the dashboard and reports that PBXDom needs to set up and maintain the Windows box. Although many users did that, setting up and maintaining a Windows box, for many users, is a struggle, and they often move to another solution.
2- PBXDom collector connects to Asterisk with AMI ( Asterisk Manager Interface), which is a TCP connection to the Asterisk server by port 5038 (default port). Asterisk will send all events based on your manager’s settings to the client. The issue occurs when the connection between the Asterisk server and the Windows machine the PBXDom collector is installed on is sometimes unstable. In that situation, the PBXDom collector can’t receive the events during the disconnect time and, unfortunately, loses them.
3- During the setup process, the user has to add their extensions and trunks information. PBXDom will use them to detect calls direction. If the user adds the new extension, they should update their PBXDom collector settings as well.
4- During the setup, you have to change/add some configs in the manager.conf and cdr configurations. Many users missed some steps and were unable to set up their accounts correctly.
To solve all of those problems, we built the new PBXDom collectors for all Asterisk-based phone systems. It’s binary for Linux, and the current version only works with 64x OS. It’s very easy to install by the command line and does not need any additional Windows box. It will install a daemon service on your Linux and connect to your Asterisk directly.
It automatically adds/changes the right configuration in manager/cdr configs and automatically fetches and detects all of the extensions: SIP, PJSIP, IAX, and all your trunks.
Moreover, it automatically scans your extensions, trunks and will update the configuration on PBXDom too. There is no need to update them manually.
As I mentioned before, the new collector only works with 64bits OS, so for an older system, you can still use the PBXDom collector for Windows and follow the instructions in those articles on top of the page.
Recently, Sangoma Company acquired the Asterisk, and they all provide services to end-users as FreePBX.
We tested the new collector with the following FreePBX’s versions:
SNG7-PBX-64bit-1904 with Asterisk 13
SNG7-PBX-64bit-1904 with Asterisk 16
10.13.66-64bit with Asterisk 11 (Date 2016)
10.13.66-64bit with Asterisk 13 (Date 2016)
For more info, you can check the following address:
https://www.freepbx.org/downloads/
OK, let’s get to setting up your PBXDom account with the new collector:
Step 1:
Signup on PBXDom with the following link:
Step 2:
When you confirm your account through the link sent to your email, you are redirected to the setup page on the PBXDom website. Before you start setting up the PBXDom collector software, note the following diagram. It shows the connection between your FreePBX (Asterisk) and PBXDom.

Step 3:
Connect to your FreePBX by SSH with root access privilege and run the following command:
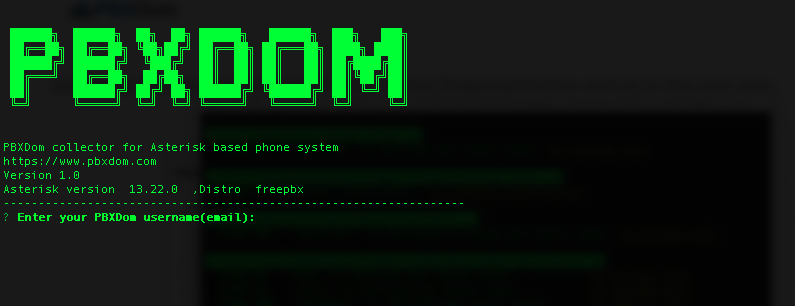
bash <(curl -s http://download.pbxdom.com/install.sh)
It will automatically download PBXDom collector binary files and run them.
Step 4:
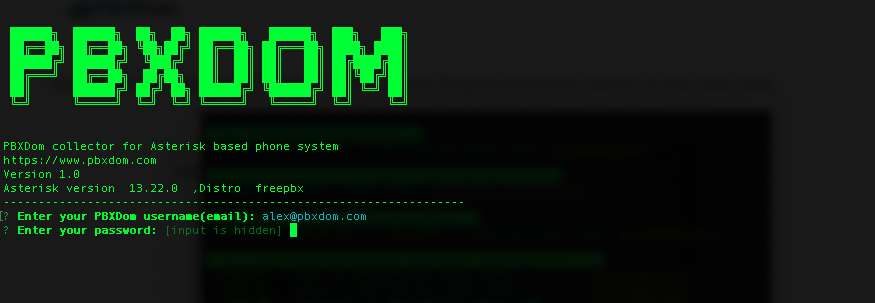
After the download has been completed, enter your PBXDom username (Email address) and password.
When you type your password, there will be no text shown on the screen. This is normal.
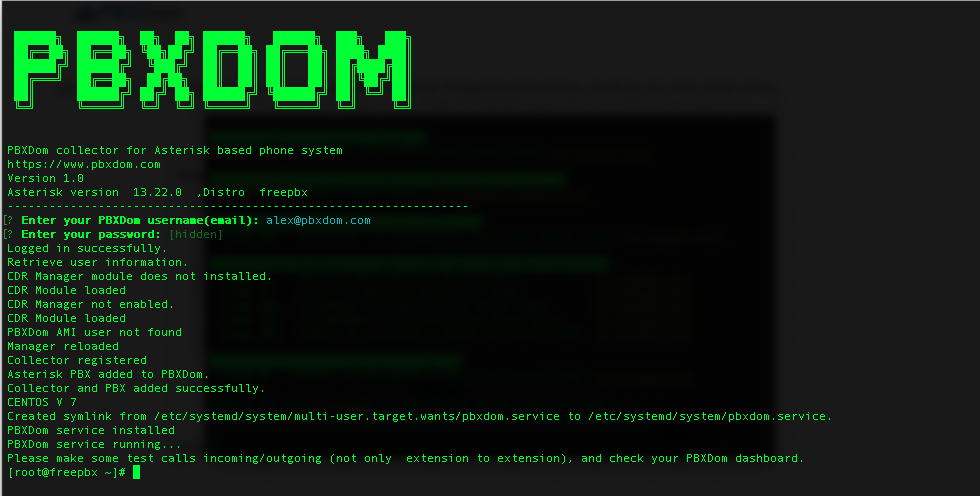
Step 5:
If you entered the correct username and password, it automatically installs PBXDom services and adds/edits the correct configuration in your Asterisk/FreePBX config files.
Notes:
1- PBXDom collector service and installation do not change any critical parts of your FreePBX/Asterisk system. It only automatically fetches your extensions and trunks information, adds a user to manager.conf, and enables cdr event in cdr_manager.conf.
2- PBXDom collector does not restart your FreePBX/Asterisk service, which means you don’t have to worry about running on production systems.
Step 6:
To verify that PBXDom collector has been installed and running successfully, check service status with the following command:
service pbxdom status
The output should be something like the following image:
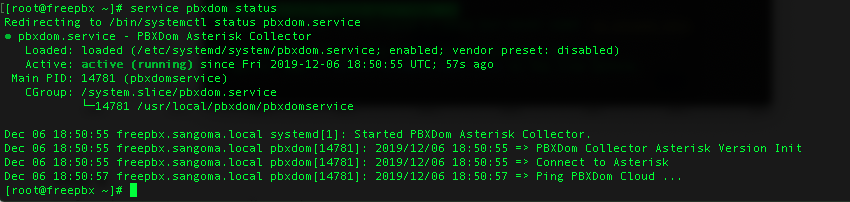
You can find the service status in line number 4, and you can see in the above image the Active: line status (running), which means the PBXDom collector software running and connected to your FreePBX/Asterisk.
Before moving to the next step, note the following about How PBXDom collector works:
1- PBXDom collector connects to your FreePBX by AMI protocol (by default TCP 5038) and captures all events.
2- PBXDom collector saves events and compresses them, and securely uploads them to PBXDom clouds.
3- After processing, you can see the call information in your dashboard/report; this usually takes under 2 minutes.
4- The connection between the PBXDom collector and the Internet is an outgoing connection, which means there is no need to open any ports on your router or firewall for the incoming connection.
5- PBXDom collectors use TCP ports 80, 443, 53 for communications.
6- If for some reason, your FreePBX/Asterisk server can’t access the Internet; there’s no need to worry. PBXDom collector captures all data, and when connected to the internet again, it will send all of the data and without losing any information.
Step 7:
In our current version of the PBXDom web app, you will be redirected to the setup page directly after verifying your email address and be shown the wizard for a step-by-step installation with the Windows collector version. To see your dashboard, log out from PBXDom, clear your browser cache and cookies, and log in again.
Also, make some test calls to send enough events to PBXDom.
If you need any help, don’t hesitate to get in touch with the following link:
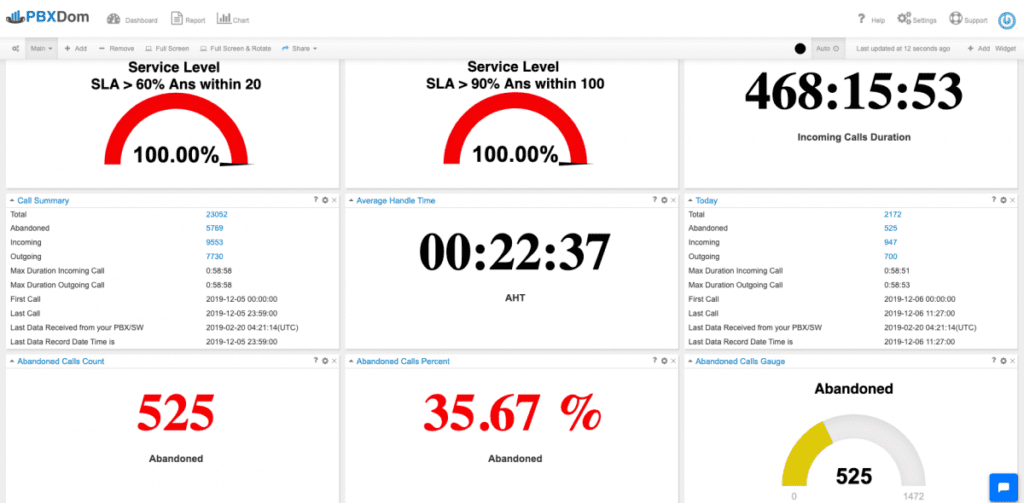
Finally, I hope with the new PBXDom collector for FreePBX/Asterisk system; you can easily connect and set up a dashboard for your phone system. I’m sure you will be happy with the result and a zero-maintenance solution like PBXDom.
For more information about PBXDom, I suggest watching the Academy videos on the following page: