Account
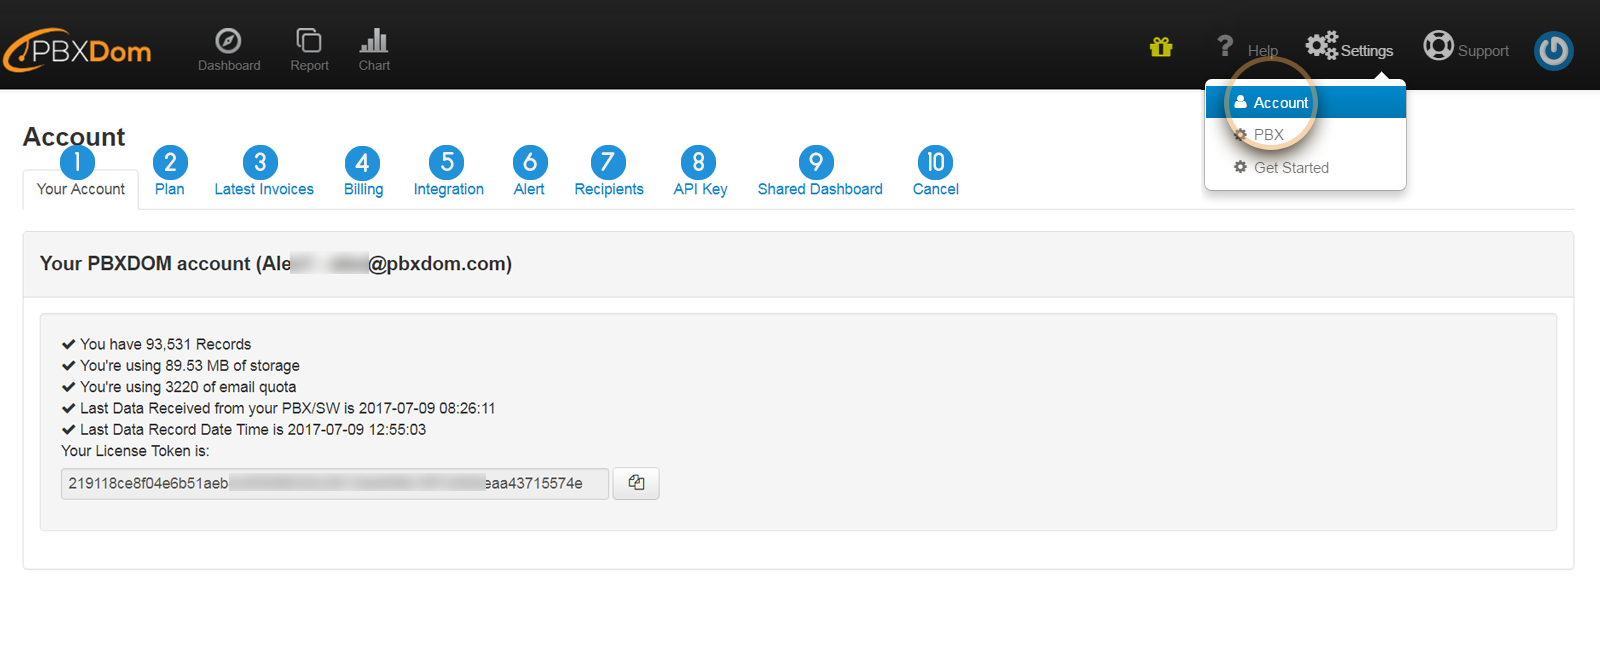
1. Your Account: you can find some information about the current running account, like the total number of records, memory storage, License Token and more.
2. Plan: you can find about the selected plan for your account, and even change and upgrade it to another one.
3. Latest Invoices: this section presents a list of the last issued invoices for the current account.
4. Billing: this section shows your credit card information. Also, you can change the information.
5. Integration: in this section, you can integrate PBXDom with dozens of tools like Slack.
6. Alert: you can create alerts in this section and edit them.
7. Recipients: you can define all the recipients of the alerts under Recipients section.
8. API Key: this section offers the developers the PBXDom API to become able to integrate their applications with PBXDom.
9. Shared Dashboard: you can find a list of all the URL links generated for sharing read-only displays of different dashboards.
10. Cancel: here, you can cancel your account. After canceling your account, your account information and data will be permanently deleted after 30 days. And your credit card is no longer charged.
Recipients
Under the Recipients section, you can find a list of all the recipients of the alerts, and even add new recipients.
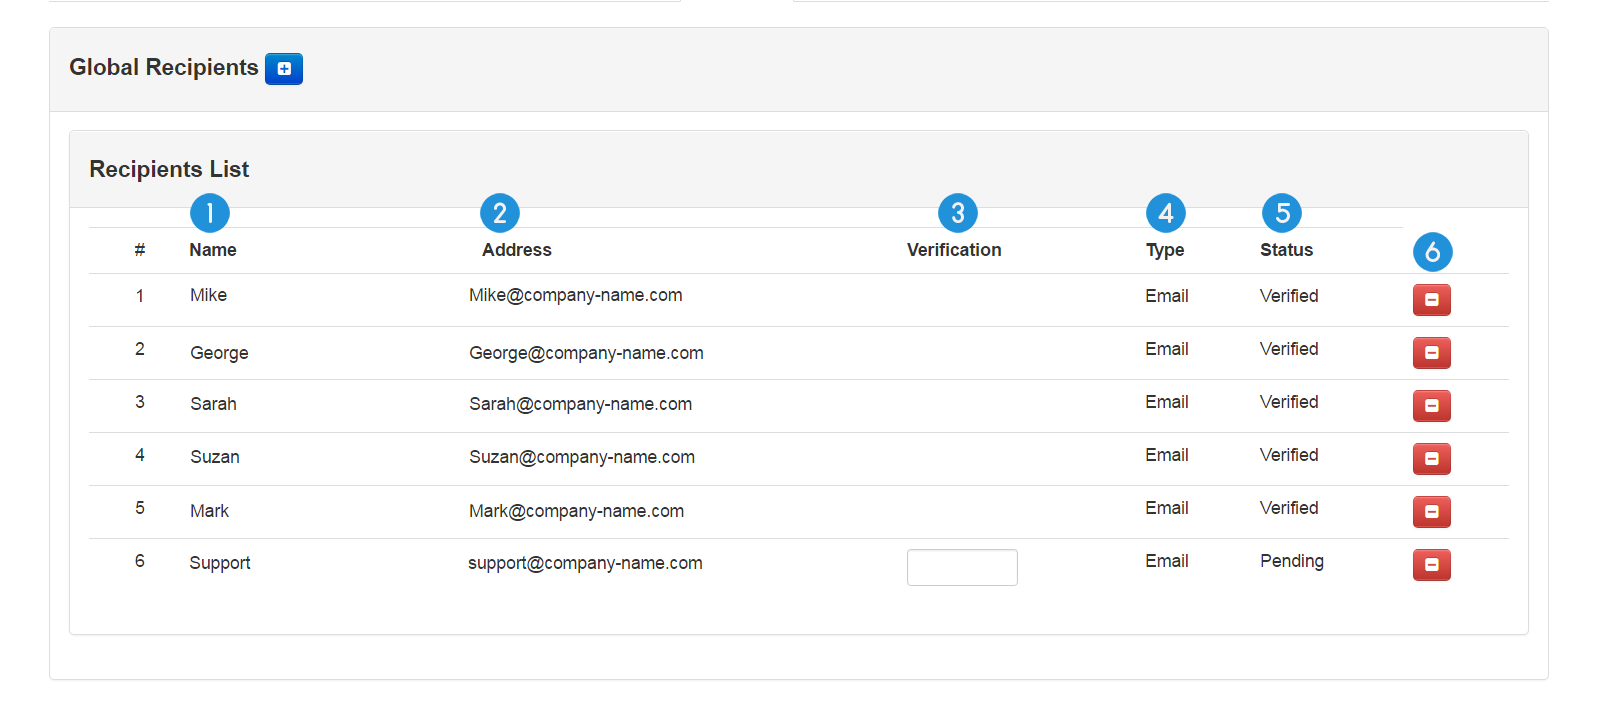
1. Name: name of the recipient
2. Address: Email address of the recipient
3. Verification: verification input field
Note: after adding a person to the Recipients list, a code will be sent to them via the entered Email address to get verified by them.
4. Type: the defined type of the alert to be sent to the recipient
5. Status: this column shows whether or not a recipient is Verified or still Pending.
6. Remove/Delete: you can easily delete the recipient from the list by clicking on the red minus button.
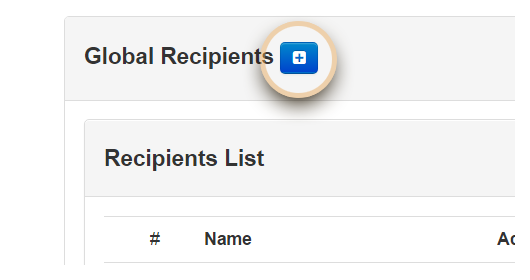
Adding a Recipient
To add a recipient, click on the Add icon to the right of the Global Recipient.
Then a section appears right below the Recipients List, which is designed for adding new recipients by entering their information.
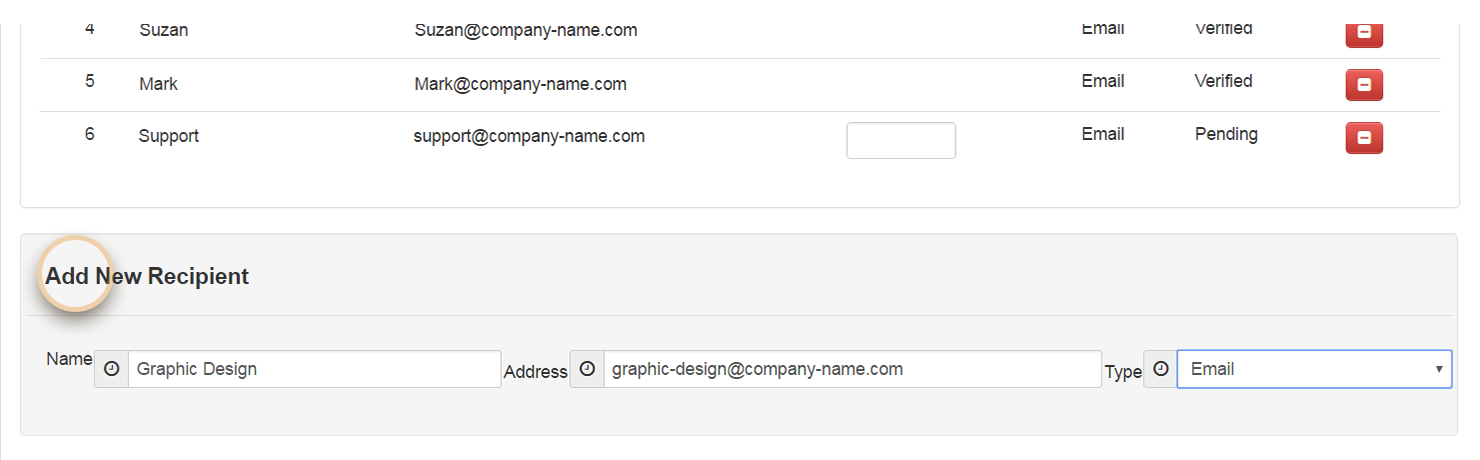
After filling the Name, Address for the Email address, and specifying the type of the alert from the Type menu list, then press Enter on the keyboard.
A Verification Email will be sent to the entered Email address, along with a code. After checking your Email account, enter the received code in the verification input field on Recipients List.
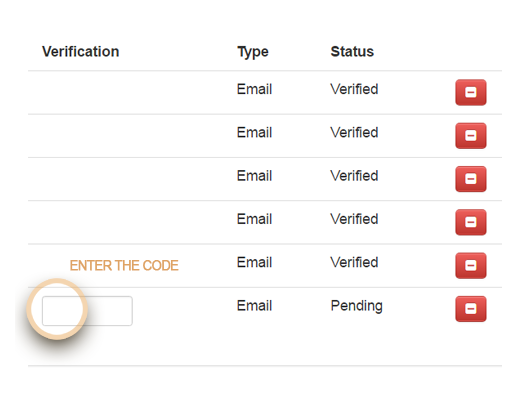
After entering the code in the verification field accurately, the recipient status changes from Pending to Verified.
Removing a Recipient
In order to remove a recipient, click on the red minus button.
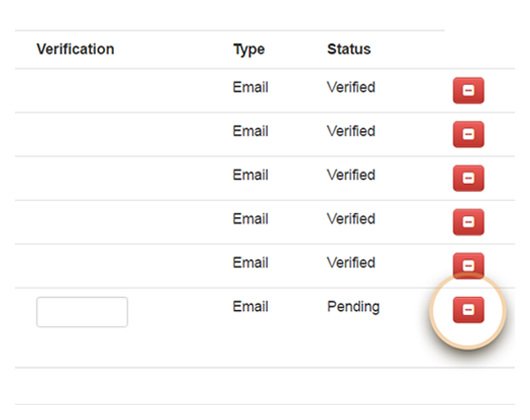
Then a dialog box appears on the screen. You can either confirm the deletion by clicking on Yes or cancel out by clicking on No button.
Alerts
Creating alerts for different purposes is another great feature of PBXDom. You can create an alert to receive immediate notification when a person calls 911, or when a phone is abandoned (missed). Not only you can create alerts of different types, you can also define conditions for them. Alerts are not triggered unless the specified conditions are met.
Conditions can be based on the type of the calls, incoming, outgoing or abandoned (missed call), or even the duration of the calls. For example, you can set the alerts to be sent to the recipients whenever a call is abandoned, or if the duration of an outgoing call is greater than five minutes, and a lot more.
Note: Make sure that your PBX supports all fields in your alert conditions.
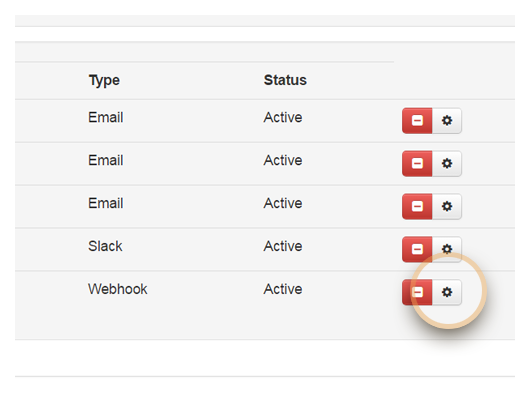
By clicking on the Alert section, you can find a list of all the alerts saved for the current account.
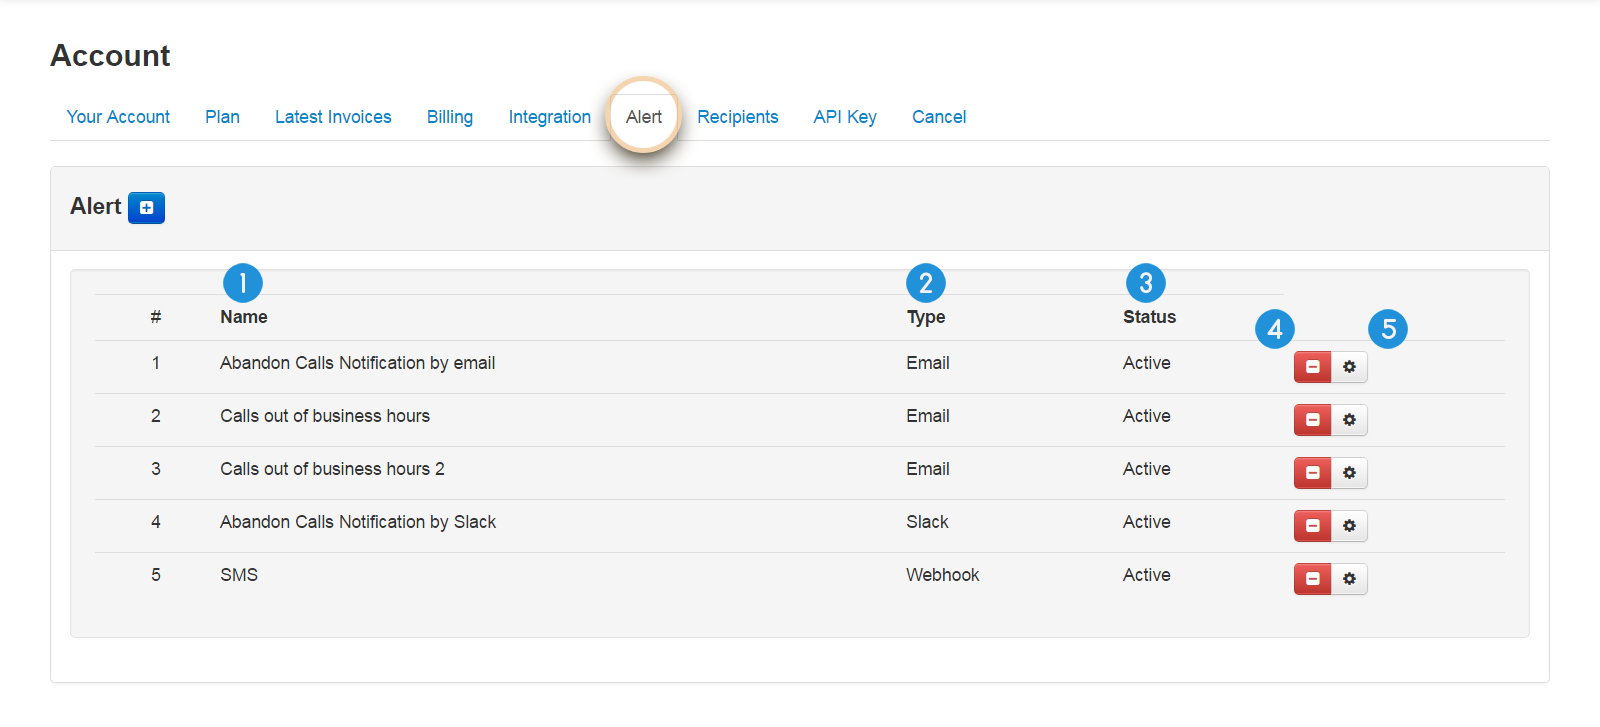
1. Name: name of the alert
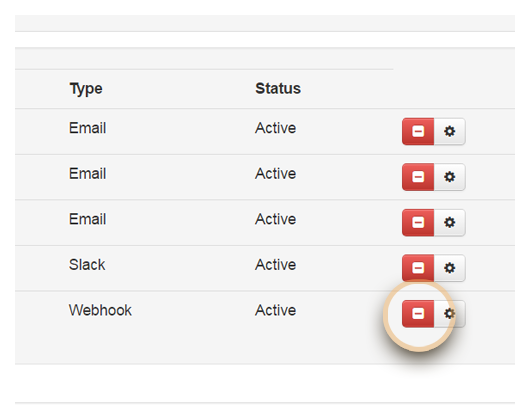
2. Type: this column shows how the recipients receive a specified alert
Note: a recipient can receive an alert via Email, Webhook or URL address, Slack or other web applications.
3. Status: this column shows us whether an alert is Active or Inactive.
4. Remove/Delete: minus button for deleting an alert
5. Edit: gear icon for editing the alerts
Adding an Alert
Under the Alert section, click on the Add button to create a new alert.
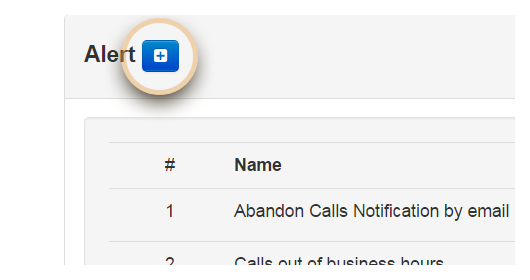
Then, right below the alerts list, New Alert section appears.
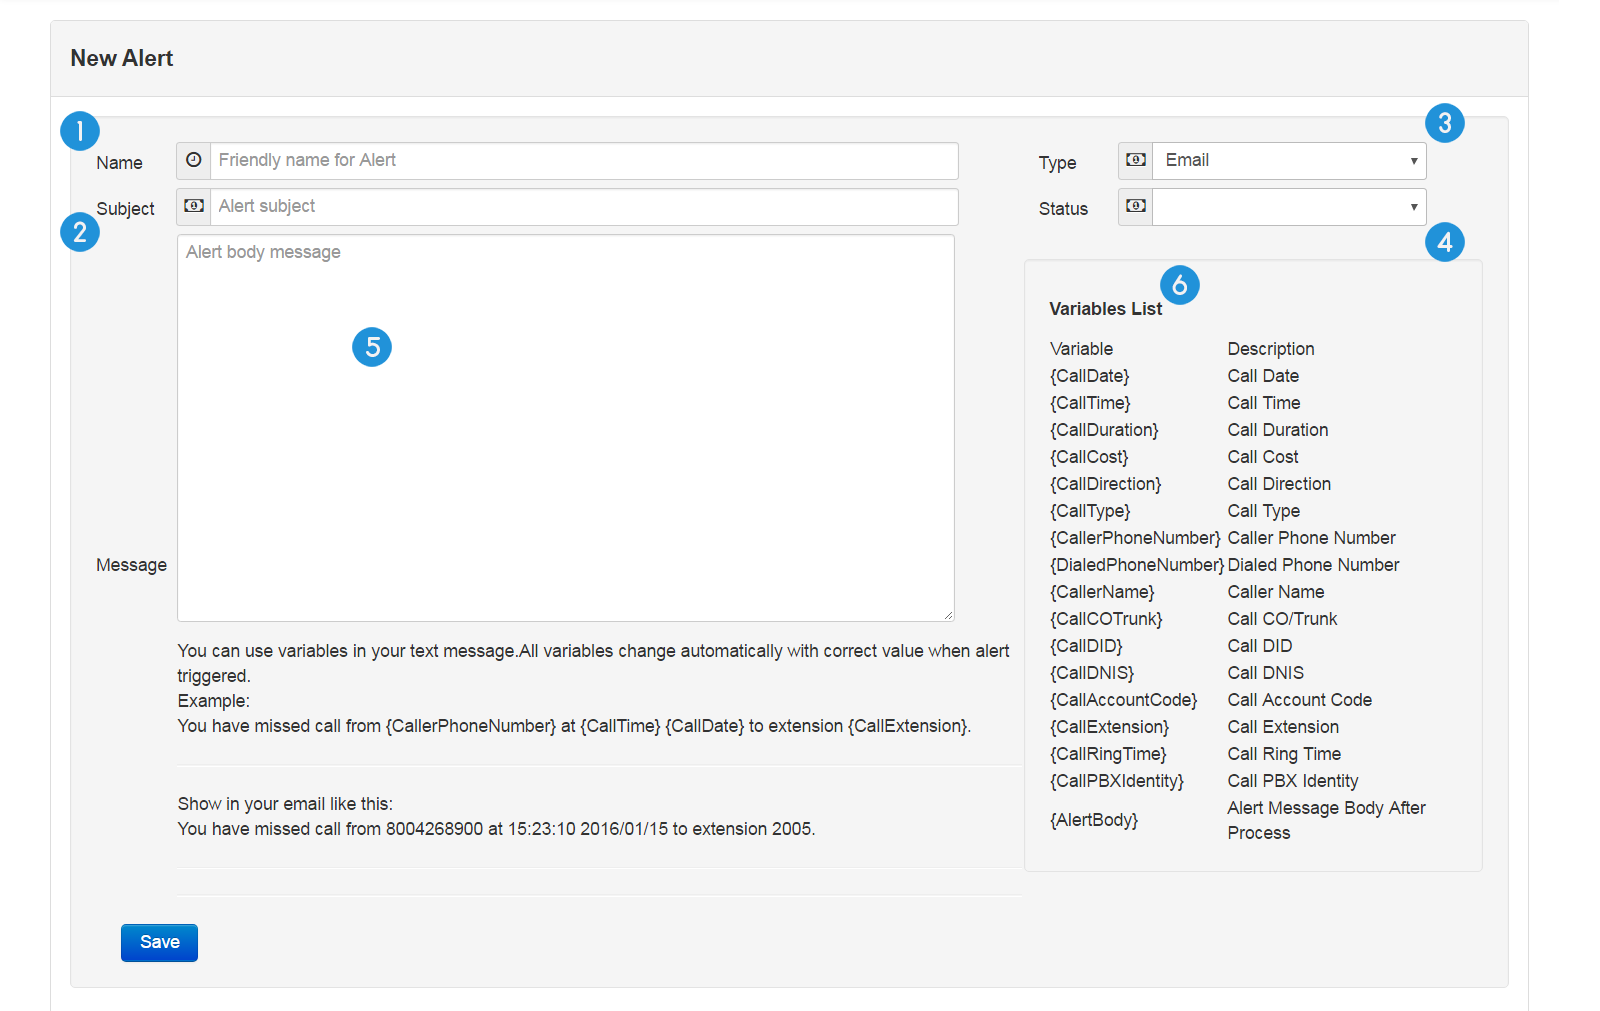
1. Name: enter a name for your new alert
2. Subject: describe the subject of the alert
3. Type: define how the recipient(s) receive the alert. A recipient can receive an alert via Email, Webhook or URL address, Slack or other web applications.
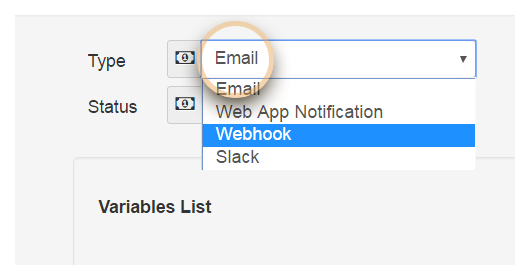
a. Email allows you to send alerts to the recipients’ Email address.
b. Web Application Notification allows you to send alerts to web applications.
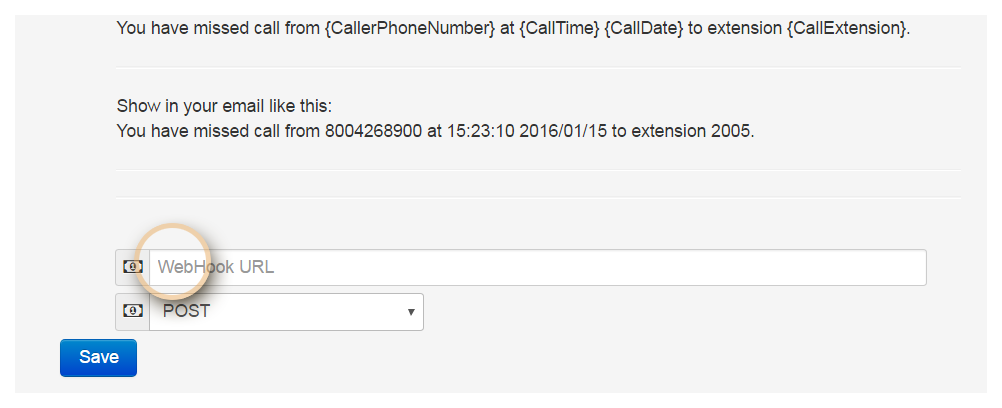
c. Webhook allows you to send an alert to a URL.
Right at the bottom of the New Alert section, two other input fields appear that you can enter a URL address, and select the HTTP Method.
d. You can send an alert to a recipient’s Slack channel.
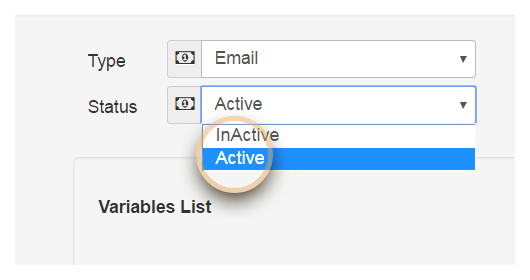
4. Status: activate or deactivate an alert by selecting Active or Inactive.
5. Message: the whole content of the alert can be written in this text field.
6. Variables List: a list of variables which can be added to the alert body in the Message section. Once an alert is triggered, all the variables automatically change to some readable and real values.
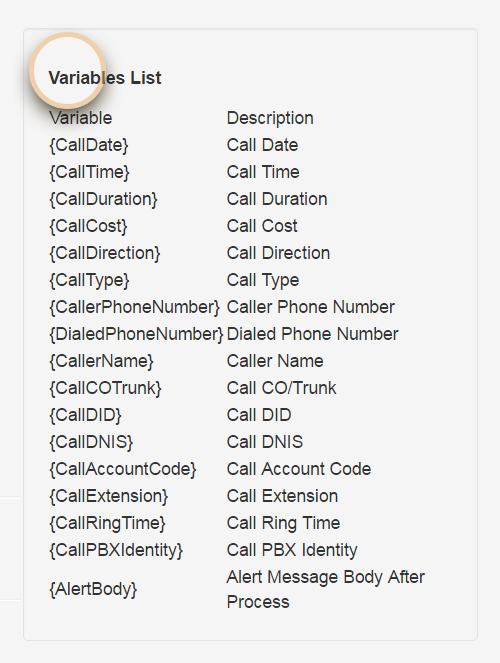
Example:
Assuming that you have created an alert as below, in which you both have some text and variables:
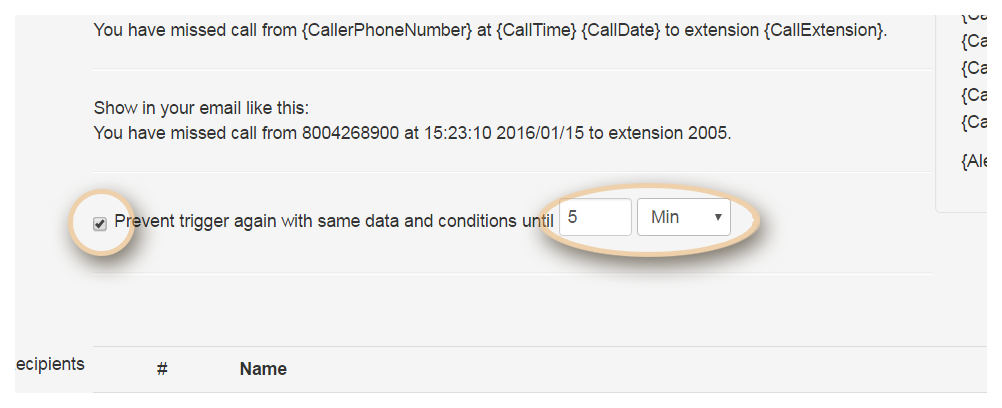
You have a missed call from {CallerPhoneNumber} at {CallDate}-{CallTime} to extension {CallExtension}.
After the alert is triggered, all the variables automatically change to some readable and real values:
You have a missed call from 8004268900 at 15:23-2016/01/15 to extension 2005.
After writing your alert, press the Save button. Then the new alert is added to the bottom of the Alert List.
In the next step, you will need to select your alert recipients and define the alert conditions. Because alerts are meaningless without conditions. For doing so, click on the Gear icon.
To avoid PBXDom sending similar alerts over and over again from one caller phone number, you can check the “Prevent Trigger…” checkbox and specify a range of time. Therefore, no similar alert from the same phone number will be sent to the recipients within the range starting at the time of the first call, up to when the defined time ends.
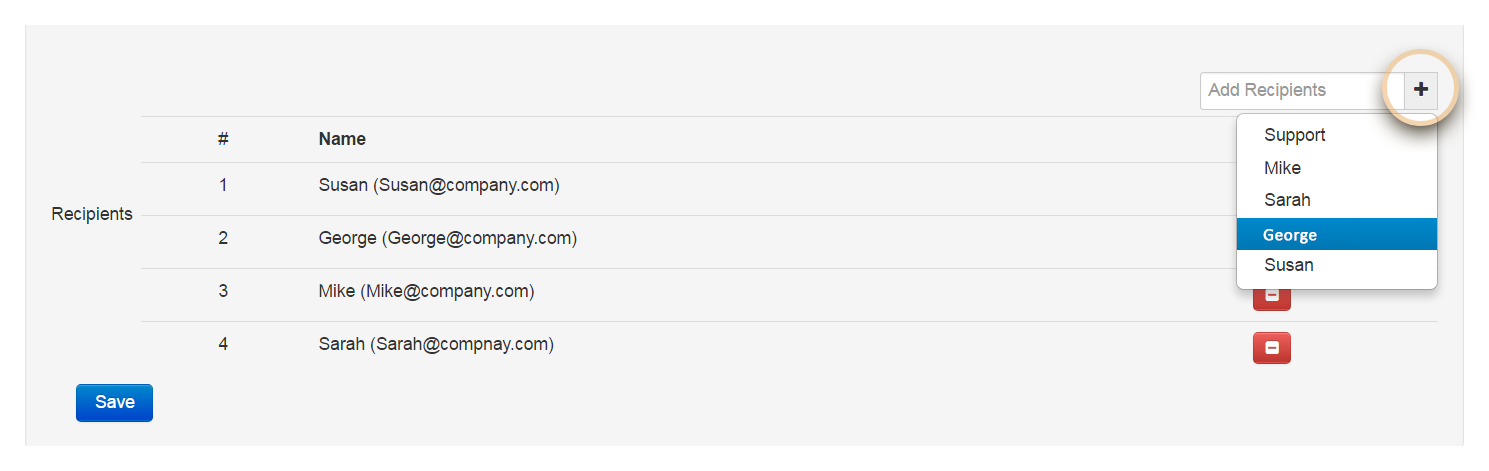
If you set the type of the alert to Email, then you can make a list of all the recipients to whom you are interested in sending the alert by adding them to the Recipients list.
Then, you need to add the alert conditions by clicking on the Add Conditions button.
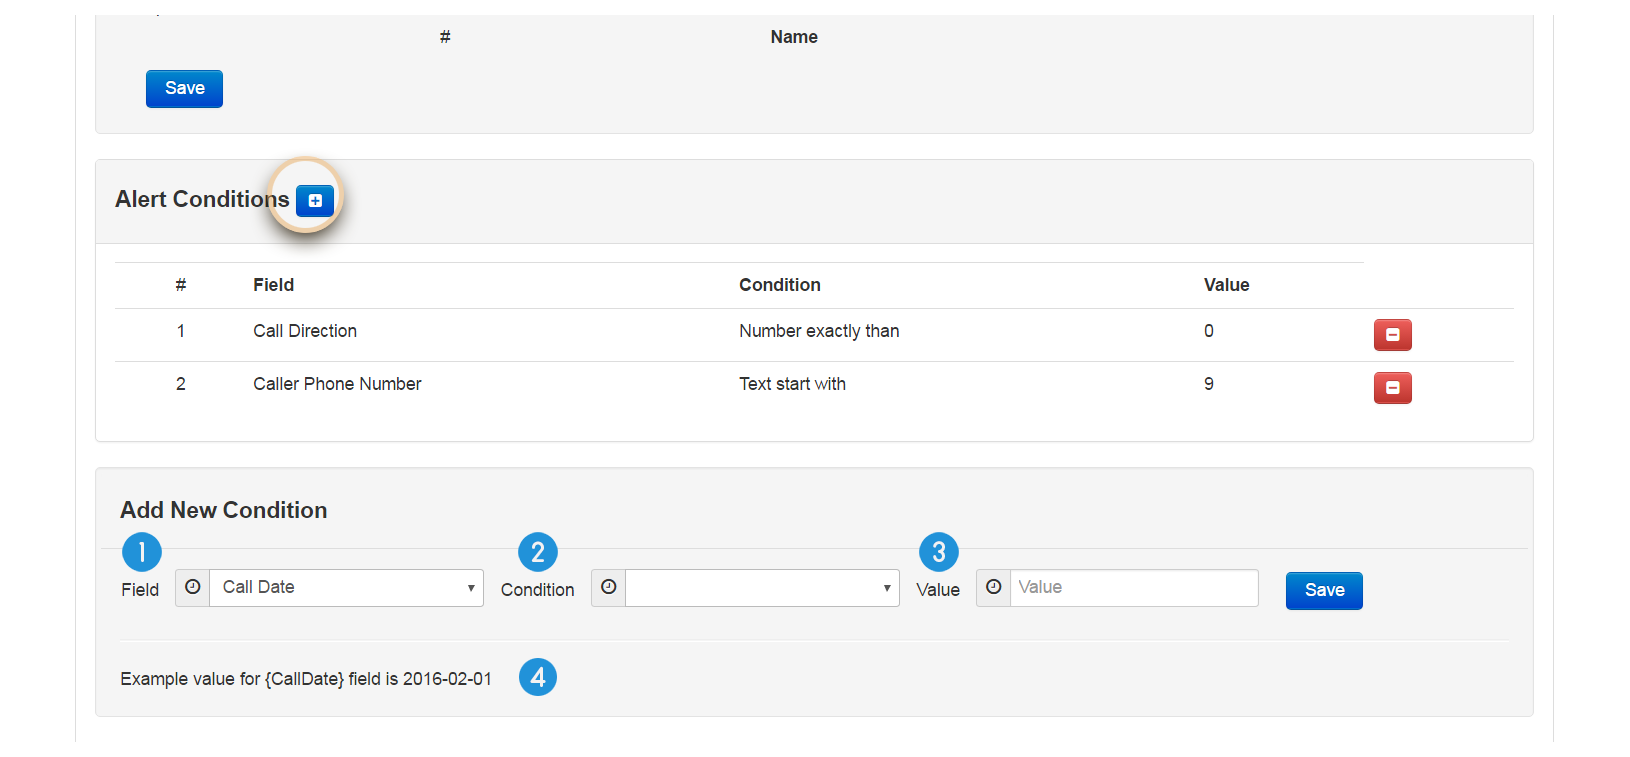
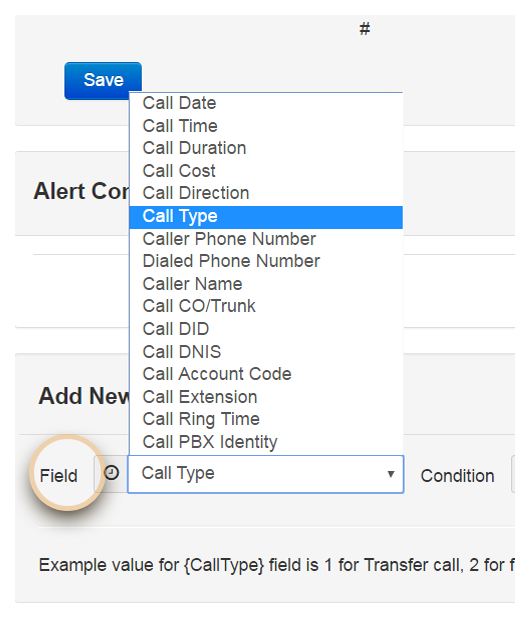
1. Field: a list of all the fields
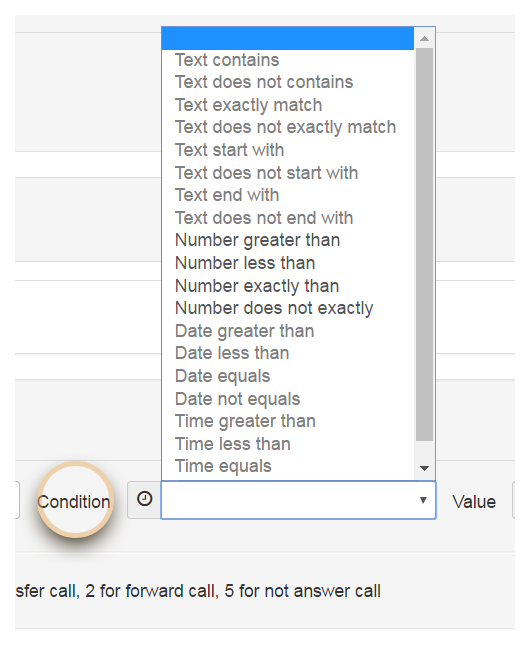
2. Condition: a list of all the available conditions
3. Value: enter the value of the conditions in this field
4. Example: examplevalue for each field
Here is a detailed list of all the fields and their possible conditions and values:
| # | Field | Description | Example Value | Available Conditions |
|---|---|---|---|---|
| 1 | Call Date | Call Date | 2016-02-01 | Date greater thanDate less thanDate equalsDate not equals |
| 2 | Call Time | Call Time | 16:12:00 | Time greater thanTime less thanTime equalsTime not equals |
| 3 | Time Duration | Time Duration | 00:10:00 | Time greater thanTime less thanTime equalsTime not equals |
| 4 | Call Cost | Call Cost | 5 | Number greater thanNumber less thanNumber exactly thanNumber does not exactly than |
| 5 | Call Direction | Call Direction | 0 for incoming call1 for outgoing call2 for internal call | Number greater thanNumber less thanNumber exactly thanNumber does not exactly than |
| 6 | Call Type | Call Type | 1 for Transfer call2 for forward call5 for not answered call | Number greater thanNumber less thanNumber exactly thanNumber does not exactly than |
| 7 | Caller Phone Number | Caller Phone Number | 8004268900 | Text containsText does not containText exactly matchText does not exactly matchText starts withText does not start withText ends withText does not end with |
| 8 | Dialed Phone Number | Dialed Phone Number | 8004268900 | Text containsText does not containText exactly matchText does not exactly matchText starts withText does not start withText ends withText does not end with |
| 9 | Caller Name | Caller Name | PBXDom | Text containsText does not containText exactly matchText does not exactly matchText starts withText does not start withText ends withText does not end with |
| 10 | Call CO/Trunk | Call CO/Trunk | 01 | Text containsText does not containText exactly matchText does not exactly matchText starts withText does not start withText ends withText does not end with |
| 11 | Call DID | Call DID | 4720 | Text containsText does not containText exactly matchText does not exactly matchText starts withText does not start withText ends withText does not end with |
| 12 | Call DNIS | Call DNIS | 6420 | Text containsText does not containText exactly matchText does not exactly matchText starts withText does not start withText ends withText does not end with |
| 13 | Call Account Code | Call Account Code | 1214 | Text containsText does not containText exactly matchText does not exactly matchText starts withText does not start withText ends withText does not end with |
| 14 | Call Extension | Call Extension | 1009 | Text containsText does not containText exactly matchText does not exactly matchText starts withText does not start withText ends withText does not end with |
| 15 | Call Ring Time | Call Ring Time | 00:00:30 | Time greater thanTime less thanTime equalsTime not equals |
| 16 | Call PBX Identity | Call PBX Identity | 1 | Text containsText does not containText exactly matchText does not exactly matchText starts withText does not start withText ends withText does not end with |
Alert Examples
Example 1: Receive Alert for All The Missed Calls
1. Select Call Direction from the Field list, set the Condition to Number exactly than and type in 0 as the value. Because as specified for the Call Direction, 0 value filters the incoming calls.
2. Then, select Call Type from the Field list, set the Condition to Number exactly than and type in 5 as the value. As specified for the Call Type, 5 is for not answered calls.

Example 2: Receive an Alert When a Person Calls 911
1. Select Call Direction from the Field list, set the Condition to Number exactly than and type in 1 as the value. Because as specified for the Call Direction, 1 value filters the outgoing calls.
2. Then, select Dialed Phone Number from the Field list, set the Condition to Text exactly match and set the value to 911.

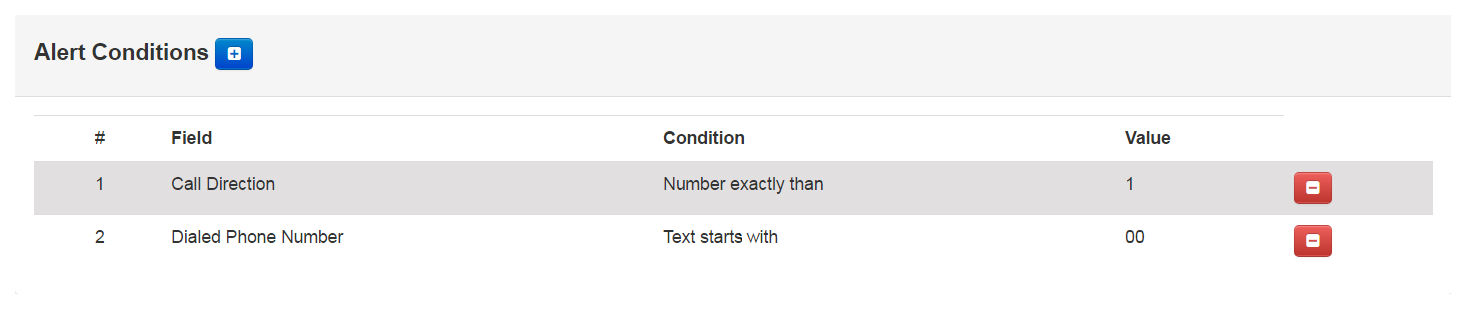
Example 3: Receive an Alert When an International Call Is Made
1. Select Call Direction from the Field list, set the Condition to Number exactly than and type in 1 as the value. As specified for the Call Direction, 1 value filters the outgoing calls.
2. Then, select Dialed Phone Number from the Field list, set the Condition to Text starts with and set the value to 00.
Assuming that the dialed number starts with 00, and not any other number prefix.
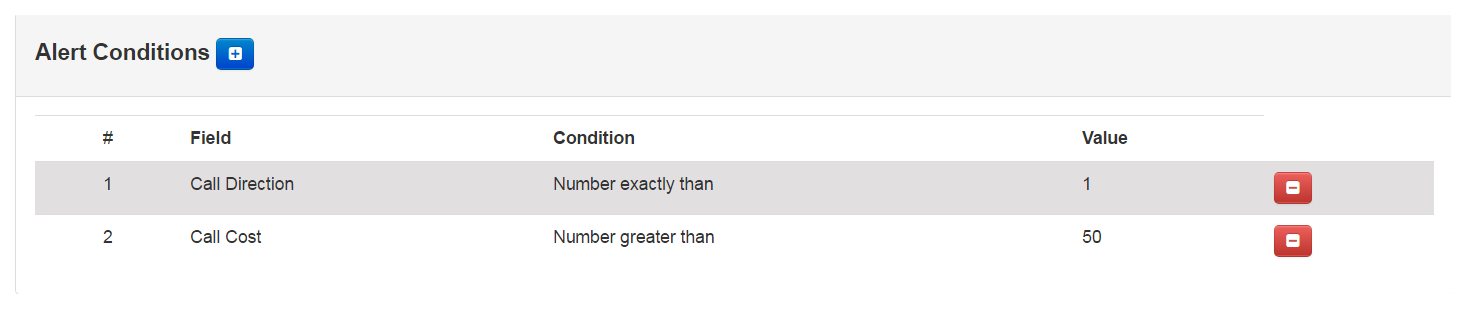
Example 4: Receive an Alert for Costly Calls
1. Select Call Direction from the Field list, set the Condition to Number exactly than and type in 1 as the value. As defined for the Call Direction, 1 value filters the outgoing calls.
2. Then, select Call Cost from the Field list, set the Condition to Number greater than and set the value to 50 dollars.
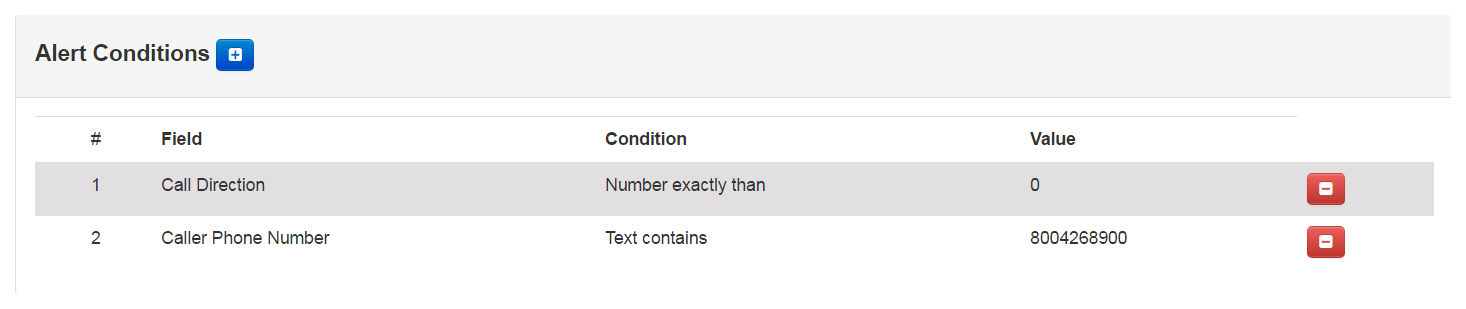
Example 5: Receive an Alert When a Certain Number Calls Your Company
1. Select Call Direction from the Field list, set the Condition to Number exactly than and type in 0 as the value. As defined for the Call Direction, 0 value filters the incoming calls.
2. Then, select Caller Phone Number from the Field list, set the Condition to Text Contains and set the value to 8004016635 as a phone a number.
Removing an Alert
Click on the Minus button to delete an alert.
Then a dialog box appears on the screen. You can either confirm the deletion by clicking on Yes or cancel out by clicking on No button.
Editing an Alert
For editing an alert, click on the Gear button.
Then Edit Alert section displays below the Alerts List. You can start changing your alert.
Shared Dashboard
In order to see a list of all the URL links generated for sharing different dashboards, refer to the Shared Dashboard section under Account setting.
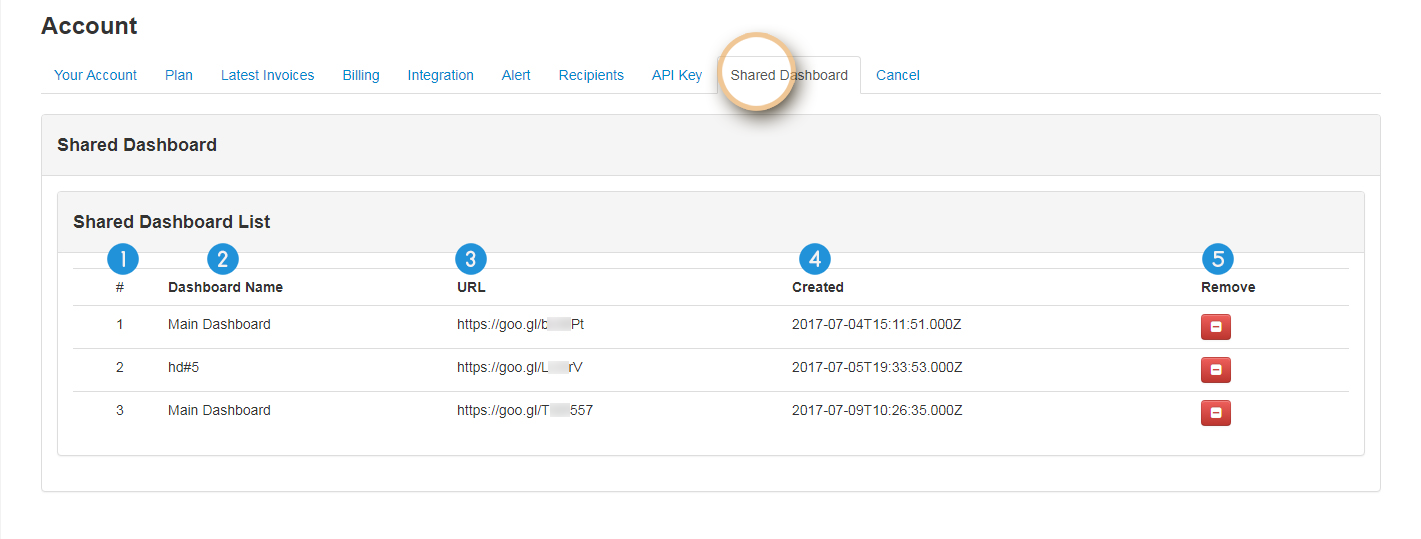
1. Number: number of the URL in the list
2. Dashboard Name: name of the dashboard
3. URL: Google shortened URL link for sharing read-only version of dashboards with others
4. Created: the date and time the URL link was created
5. Remove: remove icon for deleting the URL link forever
Under the Shared Dashboard list, you are given the power to break the links, by simply clicking on the Remove icon.
Note: if a user removes a URL link from the list of the Shared Dashboards, then nobody could view the dashboard using that link. It is a very useful and helpful way of sharing a dashboard for some period of time and then breaking the links. After deletion of a URL link, it will not work.