Cisco Unified Communications Manager (UCM) is a widely used enterprise-grade IP telephony and collaboration solution developed by Cisco Systems. Starting from version 5 and beyond, UCM offers enhanced features and improvements to provide seamless communication within organizations.
One of the crucial functionalities of UCM is the Call Detail Records (CDR) Manager. CDR records detailed information about each call, including the source, destination, duration, and various other parameters. With CDR Manager, administrators can efficiently manage and analyze call data for billing, troubleshooting, and reporting purposes.
To set up CDR Manager to send CDR files to an FTP/SFTP server, follow these steps:
Set up FTP/SFTP in Cisco UCM
You will need to configure your Cisco UCM to send the CDR data to the PBXDom collector.
Log in to Cisco UCM Administration, and from the left-hand menu, click on the System tab and select Service Parameters.
Choose your UCM node from the Server drop-down list.
Select Cisco Call Manager from the Service drop-down list.
In the System section, change the CDR Enabled Flag to True. Enable this parameter on all servers within the cluster you want to log calls for.
Change the CDR Log Calls with Zero Duration Flag to True. This parameter enables or disables the logging of CDRs for calls that did not connect.
Click on the Save button.
Click on the Navigation drop-down list from the top right-hand corner, and select Cisco Unified Serviceability. You may need to log in with a user account that has administrative permissions.
Select Tools, then click on the CDR Management tab.
Click the Add New button. You will now see the Billing Application Server Parameters window. Enter the following parameters:
Host Name / IP Address: The IP address or hostname of the machine running PBXDom collector.
User Name: Enter the username for FTP/SFTP transfers you set up in PBXDom collector.
Password: Enter the password for the FTP account you set up in PBXDom collector.
Protocol: Select FTP or SFTP as desired.
Directory Path: Enter a forward-slash character to indicate root (/).
Check tick Resend on Failure.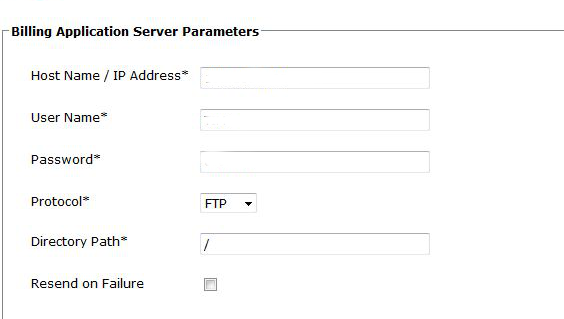
Next, click on the Add button to complete the billing server configuration. The UCM node will check that the FTP/SFTP details are valid and will write a test file to the FTP/SFTP directory. If this fails, you should double-check the details you entered.